Navigation in Jetpack Compose
Let’s Deep Dive into Compose Navigation with Nested, Multiple Backstack & Dialog Navigation

In Episode I of the Jetpack Compose Series, we covered creating a login page and played with UI elements. Now, let’s dive into an exciting topic “ Navigation in Jetpack Compose”.
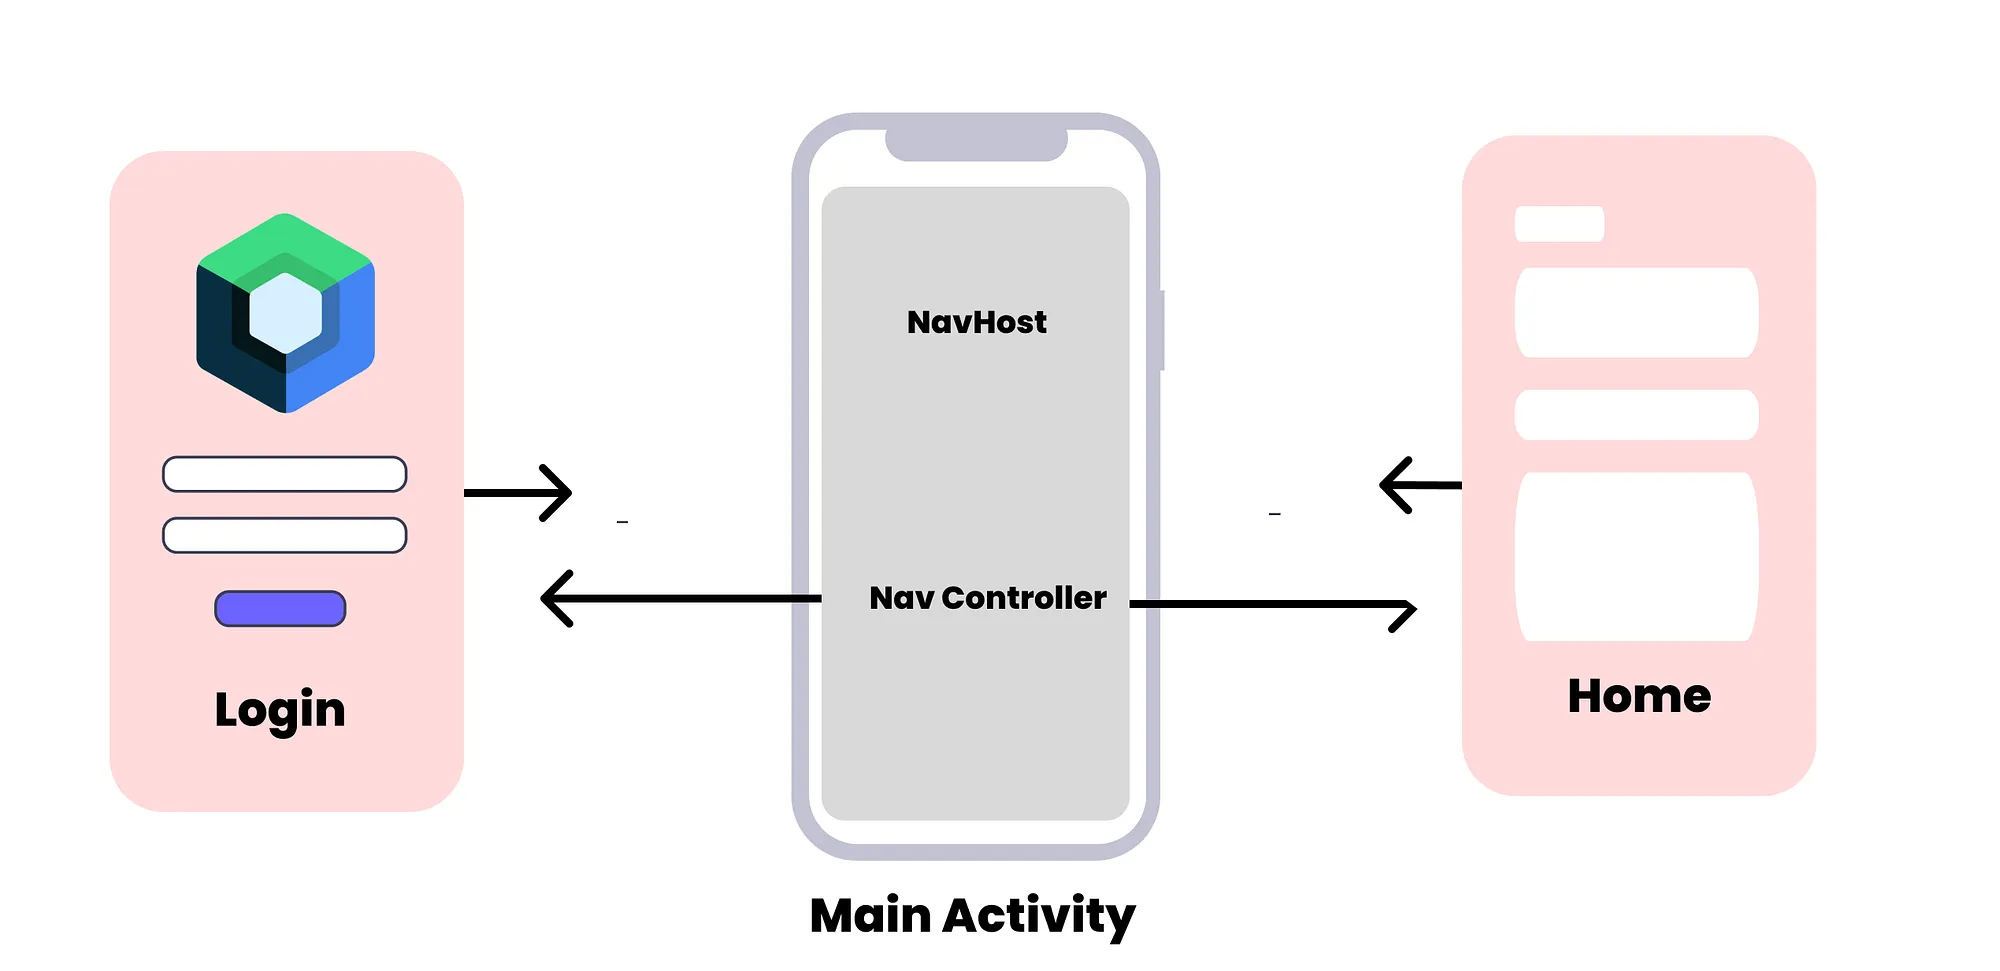
The Navigation component has significantly simplified our lives by introducing Nav- controllers, nav-graphs, and Navhost.
NavHost
NavHost is a composable designed to hold your layouts. As you navigate through composables, the content within the NavHost changes. Each screen in the navigation has its route:
A route is a string that defines the path to your composable. You can think of it as a key that corresponds to a specific destination. Each destination has a unique route.
Remember it as a location name, each place needs a name.
val navController = rememberNavController()

NavHost(navController = navController, startDestination = "login") {
    // ...
    composable("login") {
          // Composable Screen content for the "login" destination
          LoginScreen()
    }
}
// Here, "login" is route name
// composable is a function to define a node in jetpack compose
NavController
NavController manages the stack & back stack of composables, representing the screens in your app and their respective states. It’s a dynamic entity that you can initialize as follows:
val navController = rememberNavController()
...
navController.navigate("profile")
Setup Navigation in Jetpack Compose
Before we begin, let’s include a dependency on navigation-compose.
dependencies {
    def nav_version = "2.7.6"
    implementation "androidx.navigation:navigation-compose:$nav_version"
}
We’ll construct a basic illustration featuring two screens: LoginScreen and HomeScreen. The NavHost will serve as a container, with these screens. And on successful user login, we will navigate to HomeScreen.
The NavController takes charge of navigation, it specify whether to add or remove components.
Let’s create route names for the Compose screens in the AppRouter.kt class which will include route name constants and the object of the screen that has its route.
// AppRouter.kt

private object Route {
    const val LOGIN = "login"
    const val HOME = "home"
}

sealed class Screen(val route: String) {
     object Login: Screen(Route.LOGIN)
     object Home: Screen(Route.HOME)
}
Then, lets create these two screens with a simple design.
LoginScreen.kt | HomeScreen.kt
//1. LoginScreen.kt
@Composable
fun LoginScreen() {
    // login content
}

//2. HomeScreen.kt
@Composable
fun HomeScreen() {
    // home content
}
Then, we need NavHost to display these screens, let’s call it RootNavHost.kt with the start destination “LoginScreen” → route.
// RootNavHost.kt

@Composable
fun RootNavHost() {
    val navController = rememberNavController()
    NavHost(
        navController = navController,
        startDestination = AppRouter.Screen.Login.route
    ) {
        composable(AppRouter.Screen.Login.route) {
            LoginScreen()
        }
        composable(AppRouter.Screen.Home.route) {
            HomeScreen()
        }
    }
}
Let’s include this RootNavHost in MainActivity, As our app have single activity, it act’s as a container for the other screens.
class MainActivity : ComponentActivity() {
    override fun onCreate(savedInstanceState: Bundle?) {
        super.onCreate(savedInstanceState)

        setContent {
            TestArticleTheme {
                // ....
                RootNavHost()
            }
        }
    }
}
You can design the login screen or use the login screen from previous article. Let’s create HomeScreen.
// HomeScreen.kt
@Composable
fun HomeScreen() {
    Surface(
        modifier = Modifier
            .fillMaxSize()
            .background(Color.Green),
        color = Color.Green
    ) {
        Column(
            modifier = Modifier
                .fillMaxSize()
                .padding(16.dp),
            verticalArrangement = Arrangement.Center,
            horizontalAlignment = Alignment.CenterHorizontally
        ) {
            Text(text = "Home Screen", style = MaterialTheme.typography.h4, color = Color.White)
        }
    }
}
Let’s add a Button in the login screen and do the navigation work when the user clicks the login button.
// LoginScreen.kt
@Composable
fun LoginScreen() {
    Surface(
        modifier = Modifier
            .fillMaxSize()
            .background(Color.Gray),
        color = Color.Gray
    ) {
       ... // login content
       ... // add your login email/password ui here

        Button(
                onClick = {
                    // todo login button click here

                },
                modifier = Modifier
                    .fillMaxWidth()
                    .padding(16.dp)
            ) {
                Text("Login")
            }
    }
}
Navigating with Compose
There are different ways to use NavController in Navigation. Let's see some of the ways.
- You can pass the NavController in the composable functions
@Composable
fun LoginScreen(navController: NavController) {

        Button(onClick = {
                    navController.navigate(AppRouter.Screen.Home)
                }) {
              ...
            }
}
2. Adding functions like () -> Unit as parameters for navigation.
 RootNavHost(
        navController = navController,
        startDestination = AppRouter.Screen.Login.route
    ) {
        composable(AppRouter.Screen.Login.route) {
            LoginScreen {
                // Navigation logic from LoginScreen route to HomeScreen route
                // Using lambda, if last parameter is Higher Order Function
                navController.navigate(AppRouter.Screen.Home.route)
            }
        }
        composable(AppRouter.Screen.Home.route) {
        // Navigation logic from HomeScreen route to LoginScreen route
            HomeScreen(navigateToLogin =
                      navController.navigate(AppRouter.Screen.Login.route)

        }
    }

// And add the parameter in Composable screen like

@Composable
fun LoginScreen(navigateToHome: () -> Unit) {
    // ... LoginScreen content

    // Triggering navigation from LoginScreen
    Button(onClick = { navigateToHome() }) {
        Text("Login")
    }
}

@Composable
fun HomeScreen(navigateToLogin: () -> Unit) {
    // ... HomeScreen content

    // Example of Triggering navigation from HomeScreen
    Button(onClick = { navigateToLogin() }) {
        Text("Logout")
    }
}
Done, Our Navigation is completed. 👌 Now we can easily navigate to any screen with the help of a navigation controller.
We will do the back stack & also use navigateUp() to manage the screens later in the article.
Navigation to Dialog
In Jetpack Compose, navigation to a dialog can be achieved by following steps.
RootNavHost(
        navController = navController,
        startDestination = AppRouter.Screen.Login.route
    ) {
        composable(AppRouter.Screen.Login.route) {
            LoginScreen {
                navigateTo(AppRouter.Screen.Home.route)
            }
        }

      // example for dialog composable
       dialog(
            route = AppRouter.Screen.ProductDetail.route
        ) {
             ProductDetail()
        }
    }
Full-Screen Dialog
To make your dialog full-screen we can add a new style to our theme.xml.
dialog(
        route = AppScreen.Main.ProductDetail.route,
        dialogProperties = DialogProperties(usePlatformDefaultWidth = false)
    ) {

      // value also can be  retrieve directly from responsible view-model
      val productId = rootNavBackStackEntry?.arguments?.getString("productId")
      if (productId != null){
          ProductDetailScreen(productId = productId) {
              navController.navigateUp()
          }
      }
}
Arguments in Navigation
In Compose Navigation, you can also pass information between different parts of your app. To achieve this, you include argument placeholders in your route, much like adding arguments to a deep link in the base navigation library. See Supported Arguments types
Suppose we have to navigate from the HomeScreen to the ProductDetails Page with productId as a parameter.
Let’s create ArgParams.kt for adding the argument “productId” and create a function that can help us with the route name.
AppRouter.kt
private object Routes {
    const val LOGIN = "login"
    const val HOME = "home"
    // product details
    const val PRODUCT_DETAIL = "productDetail/{${ArgParams.PRODUCT_ID}}"
}

sealed class Screen(val route: String) {

     object ProductDetail: Screen(
            route = Routes.PRODUCT_DETAIL,
            navArguments = listOf(navArgument(ArgParams.PRODUCT_ID) {
                            type = NavType.Companion.StringType}){
             fun createRoute(productId: String) =
                    Routes.PRODUCT_DETAIL.replace(
                    ArgParams.toPath(ArgParams.PRODUCT_ID), productId)
     }
}

private object ArgParams {
    const val PRODUCT_ID = "productId"

    fun toPath(param: String) = "{${param}}"
}

// changing navArgument as initialised parameter
sealed class Screen(val route: String, val navArguments: List<NamedNavArgument> = emptyList()) {
     object Login: Screen(AppRoute.LOGIN)
     object Home: Screen(AppRoute.HOME)

     object ProductDetail : Screen(
            Routes.PRODUCT_DETAIL,
            navArguments = listOf(navArgument(ArgParams.PRODUCT_ID) {
                type = NavType.Companion.StringType
            })
        ) {
            fun createRoute(productId: String) =
                Routes.PRODUCT_DETAIL
                    .replace(ArgParams.toPath(ArgParams.PRODUCT_ID), productId
            )
        }
}
Then, to navigate from HomeScreen to ProductDetailScreen we can do the following steps:
RootNavHost(
        navController = navController,
        startDestination = AppRouter.Screen.Login.route
    ) {
      HomeScreen(onProductClick = {
                val route = AppRouter.ProductDetail.createRoute(productId = it)
                navController.navigate(route)
            })
    }
Finally, to get the argument we can use backStackEntry callback of composable as follows:
RootNavHost.kt
RootNavHost(
        navController = navController,
        startDestination = AppRouter.Screen.Login.route
    ) {
      composable(route = AppScreen.Main.ProductDetail.route) {
            backStackEntry ->{
            val productId = backStackEntry.arguments?.getString("productId")

            ProductDetail(productId) {

            }
      }
}

// ProductDetail.kt
@Composable
fun ProductDetail(
    productId: String,
    onBackPressed: () -> Unit,
) {
    // product id here
    // detail content here
}
If you want to learn more visit Official doc→
Bottom Navigation in Jetpack Compose
Let’s configure the bottom navigation. Our goal is to navigate to the Bottom Navigation Page from LoginScreen.

Problem: While creating LoginScreen to HomeScreen, we had one start destination “LoginScreen”. Then, if we add bottom navigation we have the default selected bottom navigation item which is another start destination. 🤯
Solution:
The “Navigation Graph” , Graphs comes to the rescue.
Navigation Graph
The navigation graph helps to maintain the relationship between the screen.
Remember it, as a Park where you have to take a different bus that only travels up to that destination, and then you gotta take another bus. 😅
Park is (NavHost). Buses are (NavGraph). Location are (Routes)

I hope the example helped. 🗿
So, We need multiple graphs to handle multiple “start destinations”, the term “Nested Navigation Graph”.
Nested Navigation Graph
Create the necessary screens for the bottom navigation, each with a simple design. Introduce a new class specifically for managing bottom navigation items.
// AppRouter.kt
// Add another sealed class
sealed class TopLevelDestination(
    val route: String,
    val title: Int? = null,
    val selectedIcon: ImageVector? = null,
    val unselectedIcon: ImageVector? = null,
    val navArguments: List<NamedNavArgument> = emptyList()
)
To keep things simple, let’s divide the graph into two categories. Although we can incorporate multiple Nested Graphs, for now, we’re focusing on two specific cases.
In the AppScreen class, let's organize them as follows:
- The Auth Group will encompass Login and Register, where authentication is not required.
- The Main Group will include Bottom Navigation Destinations and other subsequent screens.
// AppRouter.kt
private object Routes {
    // First Graph Route
    const val AUTH = "auth"
    const val LOGIN = "login"
    const val REGISTER = "signup"

  // Second Graph Routea
    const val MAIN = "main"
    const val HOME = "home"
    const val PROFILE = "profile"
    const val NOTIFICATION = "notification"
    const val PRODUCT_DETAIL = "productDetail/{${ArgParams.PRODUCT_ID}}"

}
// groupping AppScreen
sealed class AppScreen(val route: String) {

    object Auth : AppScreen(Routes.AUTH) {
        object Login : AppScreen(Routes.LOGIN)
        object Register : AppScreen(Routes.REGISTER)
    }

    object Main : TopLevelDestination(Routes.MAIN) {

        object Home : TopLevelDestination(
                      route = Routes.HOME,
                      title = R.string.home,
                      selectedIcon = AppIcons.HomeFilled,
                      unselectedIcon = AppIcons.HomeOutlined,
        )

        object Profile : TopLevelDestination(
                      route = Routes.PROFILE,
                      title = R.string.profile,
                      selectedIcon = AppIcons.ProfileFilled,
                      unselectedIcon = AppIcons.ProfileOutlined,
         )

        object Notification : TopLevelDestination(
                route = Routes.NOTIFICATION,
                title = R.string.notification,
                selectedIcon = AppIcons.NotificationFilled,
                unselectedIcon = AppIcons.NotificationOutlined,
          )

   }
}
1— Auth Navigation Graph
Let’s introduce our initial graph with “login” as the start destination, and label the graph route as “auth,” which will facilitate navigation between graphs.
// AuthNavGraph.kt

fun NavGraphBuilder.authNavGraph(
    navController: NavHostController
) {
    navigation(
        route = AppScreen.Auth.route
        startDestination = AppScreen.Auth.Login.route,
    ) {
        composable(
            route = AppScreen.Auth.Login.route
        ) {
            // route to main navigation graph
            LoginScreen(
                navigateToHome = {
                    navController.navigate(AppScreen.Main.route) {
                        popUpTo(AppScreen.Auth.route) {
                            inclusive = true
                        }
                    }
                },
                navigateToSignUp = {
                    navController.navigate(AppScreen.Auth.Register.route)
                },
            )
        }

        composable(
            route = AppScreen.Auth.Register.route
        ) {
            SignUpScreen(onNavigateBack = {
                navController.navigateUp()
            })
        }
    }

}
2— Main for screen after a user is authenticated.
Now, let’s include an additional route for the second graph. The start destination for our second graph will be “home,” and the route will be labeled as “main.”
// MainNavGraph.kt

fun NavGraphBuilder.mainNavGraph(
    navController: NavHostController
) {

    navigation(
        startDestination = AppScreen.Main.Home.route,
        route = AppScreen.Main.route
    ) {
        composable(
            route = AppScreen.Main.Home.route
        ) {
            HomeScreen(onProductClick = {
                val route = AppScreen.Main.ProductDetail.createRoute(productId = it)
                navController.navigate(route)
            })
        }

        composable(
            route = AppScreen.Main.Notification.route,
        ) {
            NotificationScreen()
        }

        // route back to auth graph
        composable(
            route = AppScreen.Main.Profile.route
        ) {
            ProfileScreen(navigateToLogin = {
                navController.navigate(AppScreen.Auth.route) {
                    popUpTo(AppScreen.Main.route) {
                        inclusive = true
                    }
                }
            })
        }

        dialog(
            route = AppScreen.Main.ProductDetail.route
        ) {
            // val productId = backStackEntry.arguments?.getString("productId")
            // value also can be  retrieve directly from responsible view-model
            ProductDetail() {
                navController.navigateUp()
            }
        }

    }

}
Now, let’s include these graphs in our root graph as below:
@Composable
fun RootNavGraph(navHostController: NavHostController) {
    RootNavHost(
        navController = navHostController,
        startDestination = AppScreen.Auth.route
    ) {
        authNavGraph(navHostController)
        mainNavGraph(navHostController)

    }
}
Then, we can add a bottom app bar to our design as follows
@Composable
fun BottomBar(
    navController: NavHostController,
) {
    val navigationScreen = listOf(
        AppScreen.Main.Home, AppScreen.Main.Notification, AppScreen.Main.Profile
    )

    NavigationBar {

        val navBackStackEntry by navController.currentBackStackEntryAsState()
        val currentRoute = navBackStackEntry?.destination?.route

        navigationScreen.forEach { item ->

            NavigationBarItem(
                selected = currentRoute == item.route,

                label = {
                    Text(text = stringResource(id = item.title!!), style = MaterialTheme.typography.displaySmall)
                },
                icon = {

                    BadgedBox(badge = { }) { }

                    Icon(
                        imageVector = (if (item.route == currentRoute) item.selectedIcon else item.unselectedIcon)!!,
                        contentDescription = stringResource(id = item.title!!)
                    )
                },

                onClick = {
                    navController.navigate(item.route) {
                        popUpTo(navController.graph.findStartDestination().id) {
                            saveState = true
                        }
                        launchSingleTop = true
                        restoreState = true
                    }
                },
            )
        }
    }
}
And, As we are using a single activity, we have to hide our navigation on other destinations except for the main navigation page, So to do that we have to keep the state.
var navController = rememberNavController()
val navBackStackEntry by navController.currentBackStackEntryAsState()
val bottomBarState = rememberSaveable { (mutableStateOf(true)) }
val snackbarHostState = remember { SnackbarHostState() }
Let’s make a change to MainActivity with Scaffold.
@AndroidEntryPoint
class MainActivity : ComponentActivity() {

    private val TAG: String = AppLog.tagFor(this.javaClass)
    private lateinit var navController: NavHostController
    private val mainViewModel: MainViewModel by viewModels()

    private var isAuthenticated = false

    override fun onCreate(savedInstanceState: Bundle?) {
        val splashScreen = installSplashScreen()
        super.onCreate(savedInstanceState)
        setContent {
            FireflyComposeTheme {
                navController = rememberNavController()
                val navBackStackEntry by navController.currentBackStackEntryAsState()
                val currentRoute = navBackStackEntry?.destination?.route

                val scope = rememberCoroutineScope()
                val snackbarHostState = remember { SnackbarHostState() }

                val bottomBarState = rememberSaveable { (mutableStateOf(true)) }
                val topBarState = rememberSaveable { (mutableStateOf(true)) }

                // Control TopBar and BottomBar
                when (navBackStackEntry?.destination?.route) {
                    AppScreen.Main.Home.route -> {
                        bottomBarState.value = true
                        topBarState.value = true
                    }

                    AppScreen.Main.Profile.route -> {
                        bottomBarState.value = true
                        topBarState.value = true
                    }

                    AppScreen.Main.Notification.route -> {
                        bottomBarState.value = true
                        topBarState.value = true
                    }

                    else -> {
                        bottomBarState.value = false
                        topBarState.value = false
                    }
                }
                Scaffold(
                    snackbarHost = {
                        SnackbarHost(hostState = snackbarHostState)
                    },
                    bottomBar = {
                        if (bottomBarState.value) {
                            BottomBar(navController = navController)
                        }
                    }) { paddingValues ->
                    Box(
                        modifier = Modifier.padding(paddingValues)
                    ) {
                        RootNavHost(navHostController = navController)
                    }
                }

            }
        }
    }
}
Conditional Navigation — Authentication Route
In Jetpack Compose, you have various ways to handle conditional navigation. Following the recommended Android flow, you go to the main destination and revert to the login page if the user needs to be authenticated.
You can also go straight to the home screen from the login page, adjusting the starting point accordingly.
You can save a logged in status boolean value in Preference or Datastore
@Composable
fun RootNavGraph(isLoggedIn: Boolean, navHostController: NavHostController) {
    NavHost(
        navController = navHostController,
        startDestination =  if(isLoggedIn) AppScreen.Main.route else AppScreen.Auth.route
    ) {
        AppLog.showLog("Nav Graph Setup")

        authNavGraph(navHostController)
        mainNavGraph(navHostController)

    }
}
Multiple BackStack in Compose
The implementation of nested navigation with multiple backstacks in jetpack compose is available at GitHub gist. There are still some bugs in Multiple Backstack while using nav arguments. So i suggest to look in Google Issue Tracker before using it. Though, the Implementation is available at the below repository.
Thank you for reading!
We’ve learned a lot about navigation in compose, user authentication, and route changes. Next, we’ll dive into login validation, network requests for values, and storing them locally using Room, Retrofit, and Kotlin Flow.
All Jetpack Compose Series Episodes will be available in this story list.
Find more articles on the www.kt.academy